Signal Path
Master Chain
The final stage of a Chroma Glow track. This page follows the chain in order, from early peak control and tonal shaping to compression, clipping, and final loudness analysis.
Signal Path
The final stage of a Chroma Glow track. This page follows the chain in order, from early peak control and tonal shaping to compression, clipping, and final loudness analysis.
Chroma Glow Master
If you have any questions about anything listed here, please feel free to reach out to me to discuss further.
Each plugin listed here can be found on the main music page under "Plugins I Use". Each plugin in that section has a link for purchase or download.
Initial peak taming
I start with a clipper to catch the biggest peaks before the rest of the chain starts working. This helps the compressors later behave more consistently and keeps the master from reacting too aggressively to transient spikes. Depending on the track and genre, I usually clip around 8 to 12 dB here. The goal is not to destroy the signal, just to shave off the excess so everything downstream has a cleaner starting point.

Add fullness
Next, I use Sculptor to add body and smooth out the overall shape of the track. I like it early in the chain because it gives me a more balanced starting point before I get into detailed EQ work. It can gently bring out highs and lows where needed and make the whole mix feel more filled in. I usually run it around 30% to 45% strength with a slightly negative tone, usually somewhere around -3 to -8.
Master EQ
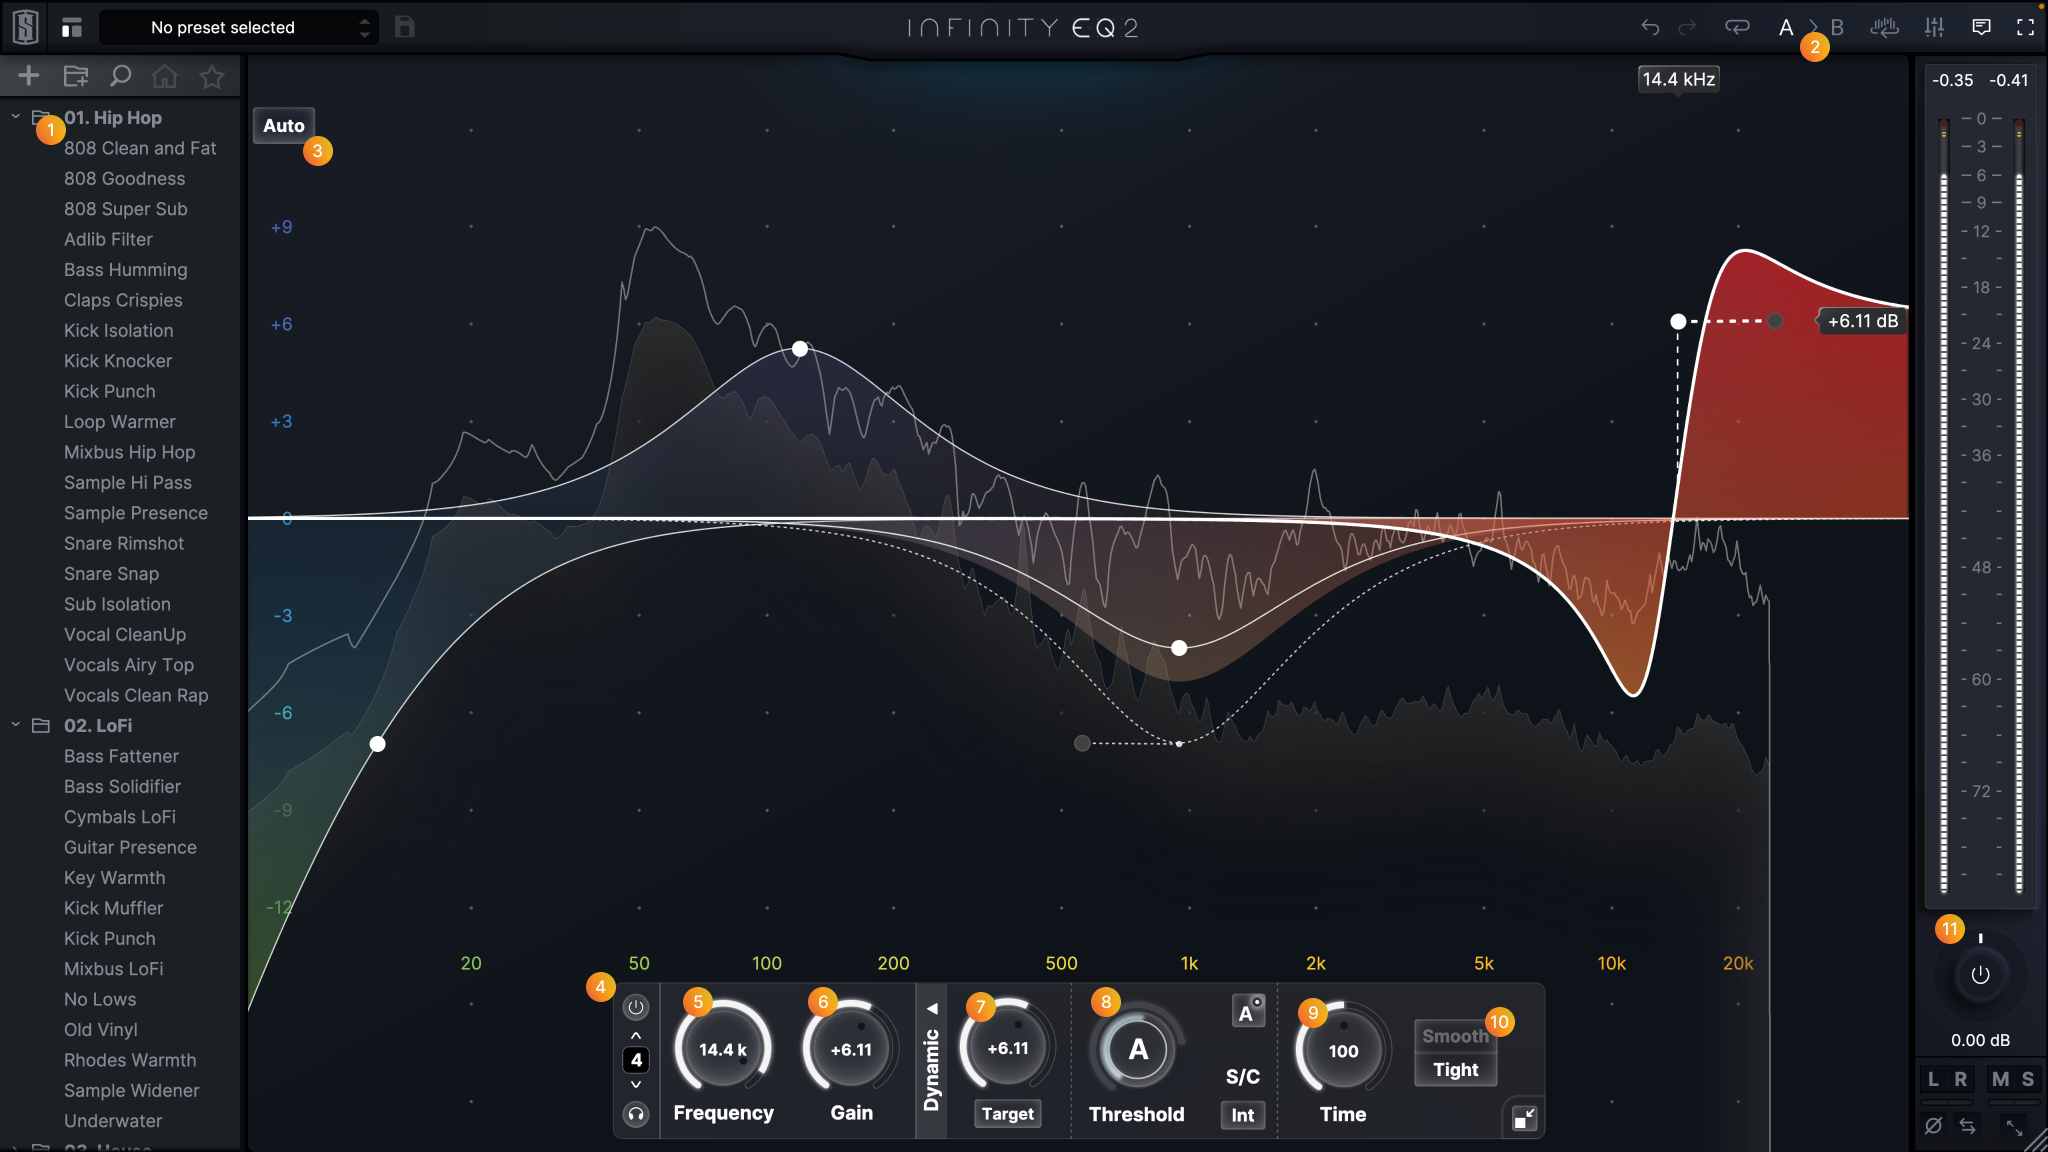
After that I use Infinity EQ 2 for the main tonal shaping of the master. This is where I add broad boosts, shelves, and detailed frequency balancing across the full range. I usually have 8 to 12 bands active and use it to fine-tune everything from the very low end up into the air band. Most of my subtractive EQ at this stage comes from the low cut and high cut, while the rest is mostly additive shaping to enhance what is already working in the mix.
Mid-Side EQ
The next stage is dedicated to width and spatial balance using mid-side EQ. I usually start by boosting the low end in the mid channel only, often from around 1 Hz up to 150 to 200 Hz, sometimes while subtracting some of that same range from the sides. From there I widen the upper mids, usually around 900 Hz to 2 kHz, and then the presence range around 3 kHz to 8 kHz, where the snare, hats, and kick click live. If I’m using the classic Chroma Glow bass, I may also add a small side boost around 400 to 800 Hz to bring out the stereo texture of the synth without affecting the mono low end. This stage is a huge part of how I make a mix feel wide without losing center focus.
Initial glue
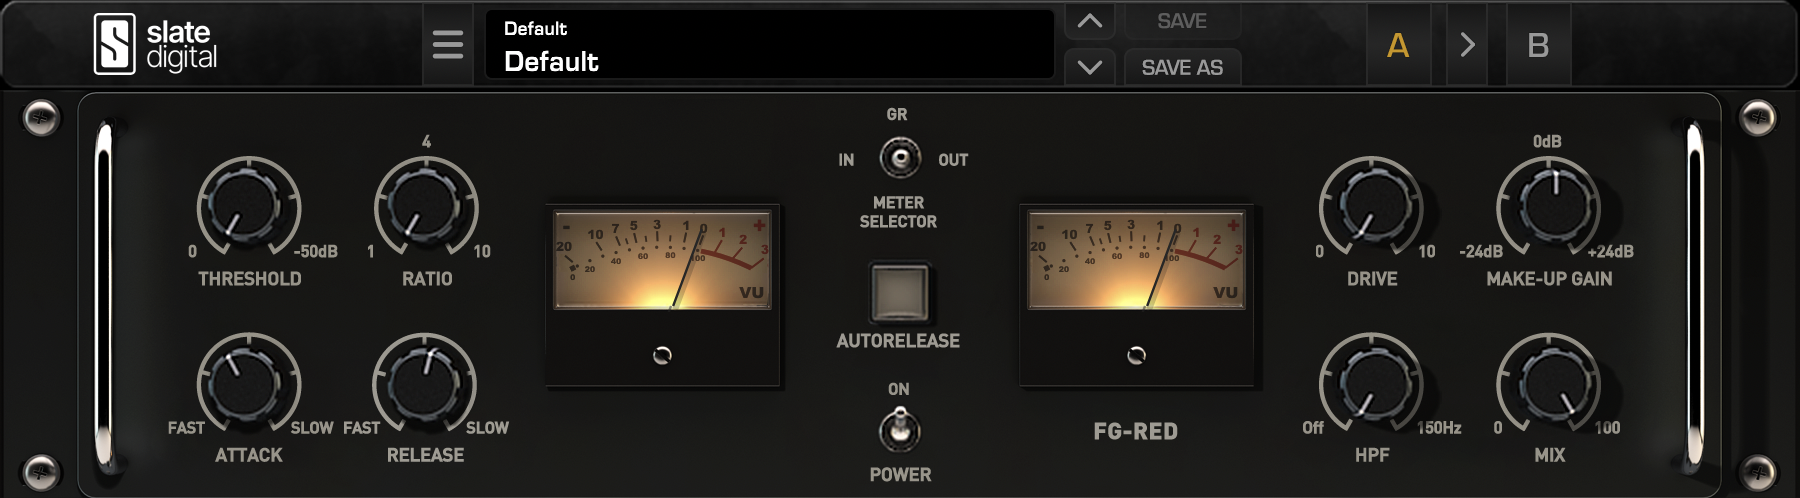
This is the first real compressor in the chain and one of the most important. I use FG-Red to pull the master together while still preserving punch from the drums and bass. I usually aim for about 3 dB of gain reduction, sometimes 4 dB max if the mix is especially dynamic. My typical setup is a 1.5:1 ratio, attack around 10 to 11 o’clock, release around 1 to 2 o’clock, and drive somewhere around 5 to 8 depending on how much bite I want. I also keep the high-pass filter around 20 to 30 Hz so the unusable sub-lows do not over-trigger compression. I almost never run this at 100% mix because I prefer a more parallel-style blend here, usually around 70% to 95%.
Dynamic control / volume control
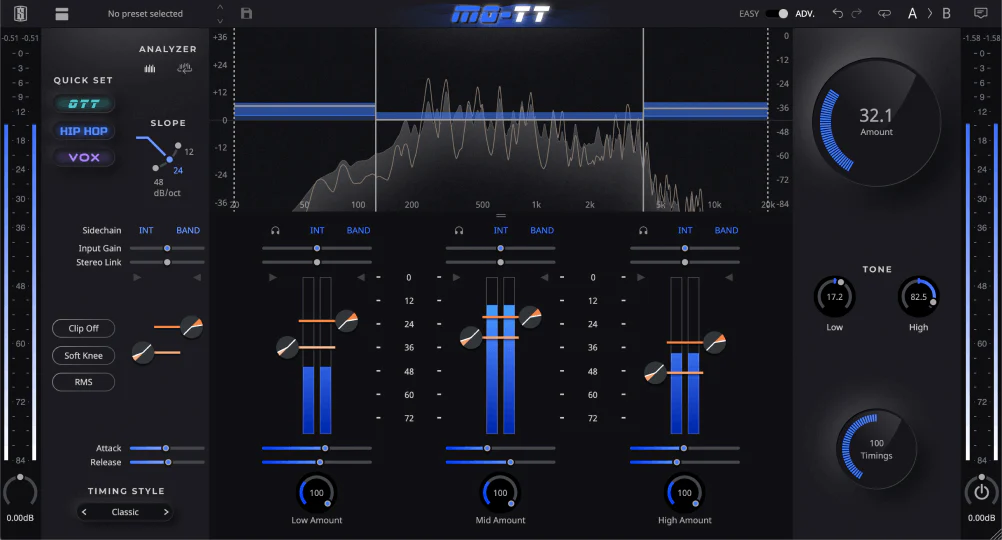
MO-TT is where I get more detailed control over the dynamic range of each frequency band. In advanced mode, it lets me shape how the lows, mids, and highs behave independently, which is really useful for taming harsh clicks, smoothing tone, or even bringing certain details forward. My exact settings change from track to track, but generally I keep the clippers at -0.2 dB, the down compressor around 1.5:1 to 1.9:1, and the up compressor around 5.5:1 to 8.5:1. That gives me gentle top-down control while still lifting quieter material when needed. I usually keep the compression levels in the high 90s, but I stay away from 100% whenever possible. The mix knob is usually somewhere around 28% to 46% because I use this more for control than loudness.
Parallel compression
After MO-TT, I use another compressor to catch any remaining unevenness and smooth out the master before the final loudness stages. This one is lighter and more controlled. I usually aim for about 2 to 3 dB of gain reduction per band before setting the mix level. My low band is usually 20 to 250 Hz at 1.6:1, my mids are 250 Hz to 3 kHz at 1.5:1, and my highs are 3 kHz to 20 kHz at 1.8:1. Attack is usually around 40 to 60 ms, and release is timed to the song using 8th or 16th note values in milliseconds. I leave makeup gain on auto and typically blend this in around 65% to 75%, rarely going above 80%.
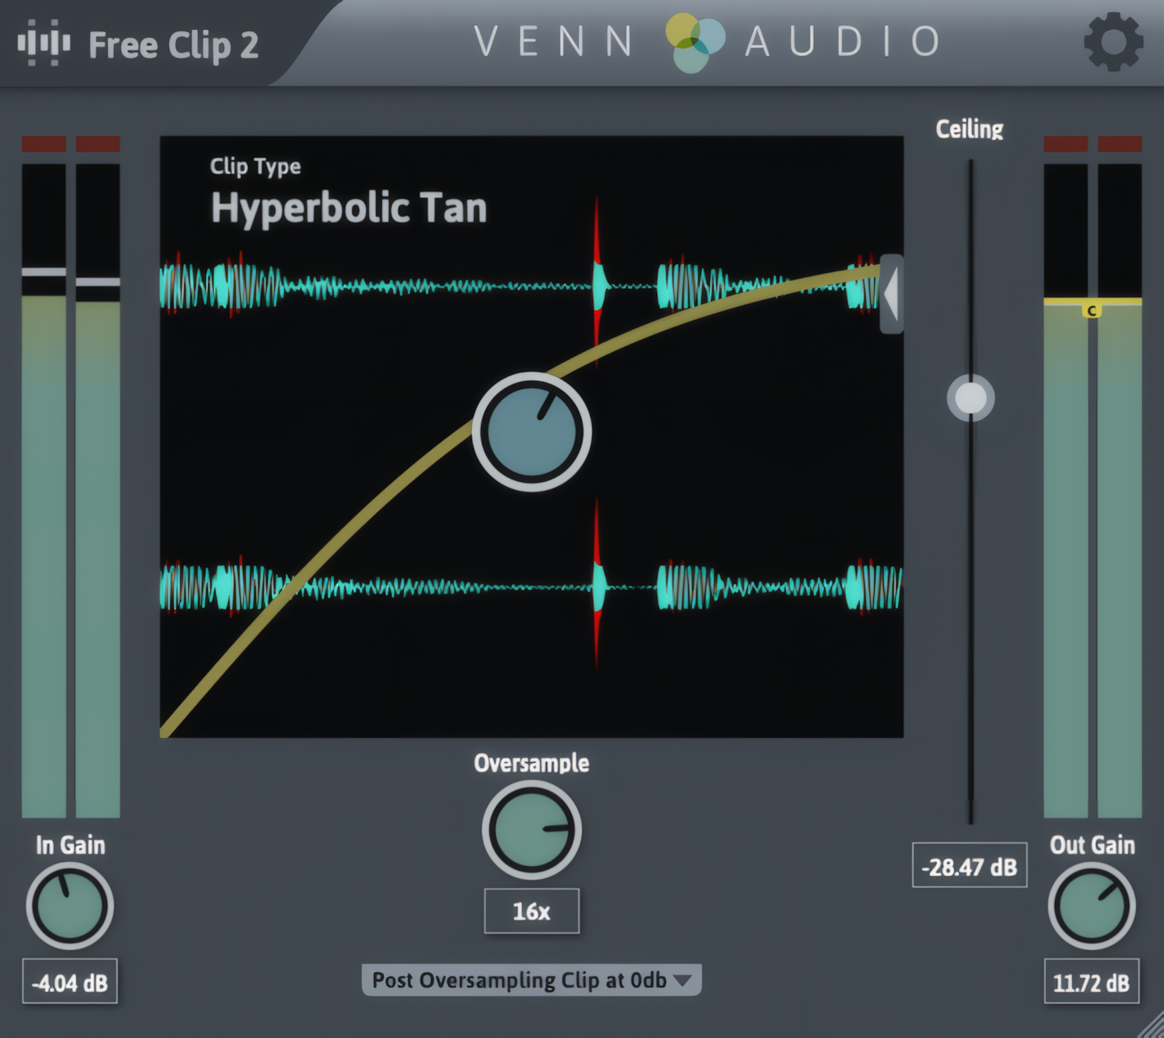
Final clipping and boost
This second clipper comes after compression and is used to trim whatever peaks are still left. For both clippers, I use the quintic curve, because I’ve found it works best for this process. I usually set the ceiling somewhere around -5 to -8 dB, depending on the track, and I always check the input first to make sure it is not already clipping before the clipper starts working. I also like to use 16x or 32x oversampling, which helps reduce aliasing and keeps the clipping cleaner and more faithful to the source. The goal here is to remove only the remaining unnecessary peaks, not to chew into the body of the signal. After clipping, I add gain back. This is one of the key loudness steps in the chain. Example:
Increase RMS
This step is optional, and I usually skip it if I am already using the clipper to add gain back. But if I do use a maximizer, this is where it goes. The advantage is that it combines gain return, RMS increase, and limiting into one stage. I set the final peak around -0.2 to -0.3 dB, then adjust the release based on the track tempo using the same 8th or 16th note timing approach I use earlier in the chain. I avoid auto release here because I want the behavior to stay predictable. The important part is the amount of gain reduction. I usually aim for 1 to 3 dB max, and I always listen carefully on good speakers for distortion or loss of punch. The point is not to crush the dynamics. If a snare hits just as hard peaking at -6 dB as it does at -2 dB, then there is no reason to keep it higher than needed. I A/B this stage carefully by lowering the stereo out and toggling the plugin on and off to make sure I am increasing loudness without damaging the character of the track.
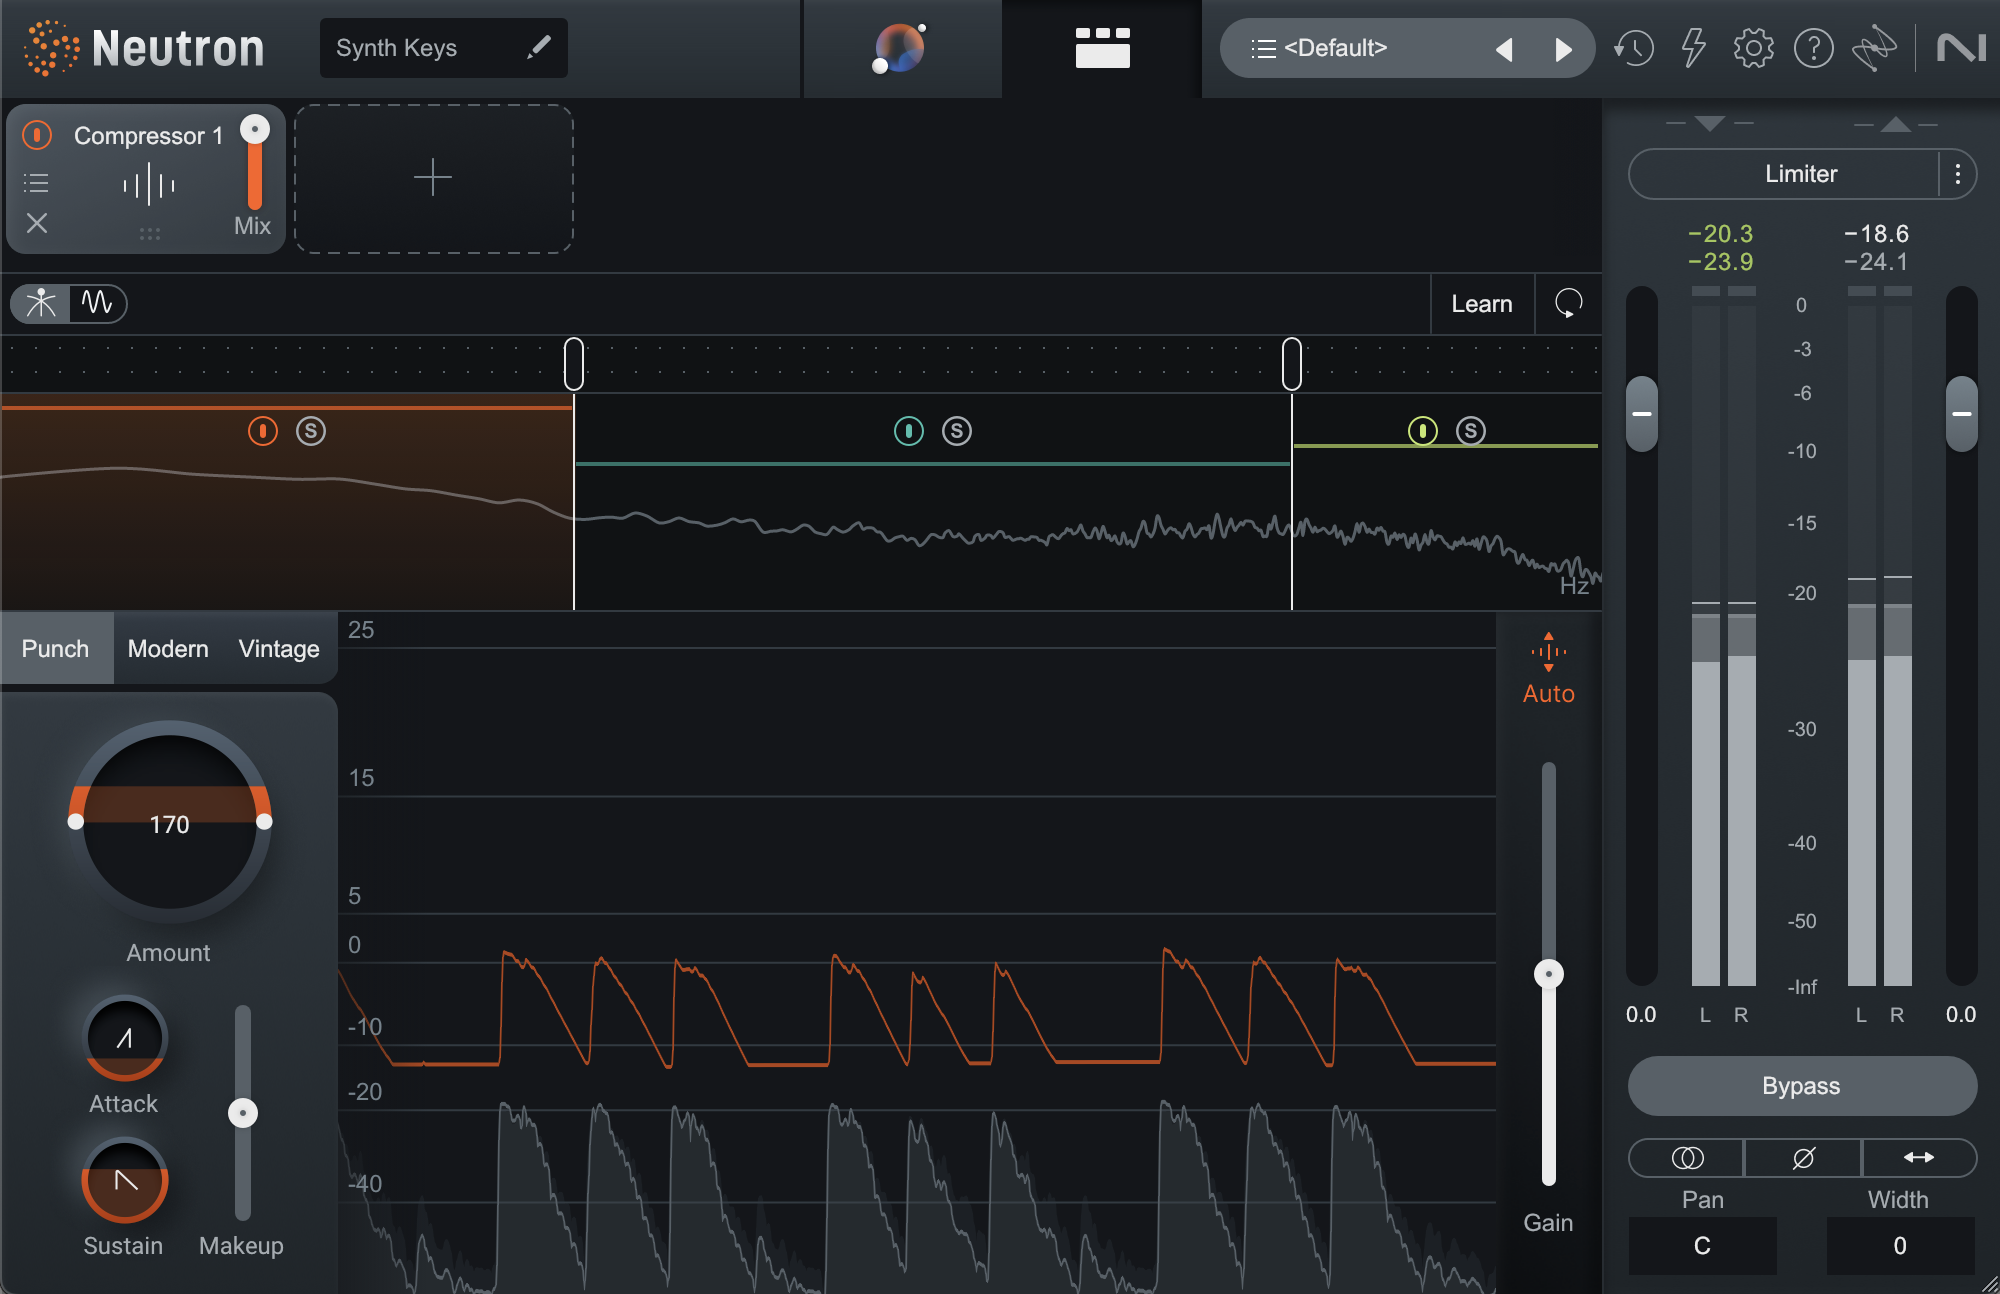
Single limiter preventative
Technically I do not need this stage because FreeClip already includes a limiter, but I still like having one more safety layer at the end. This is mostly preventative. I keep the output at -0.1 dB so there is no chance of an accidental overshoot into positive peaks. In practice, my tracks usually end up peaking around -0.2 to -0.3 dB, which is exactly where I want them.
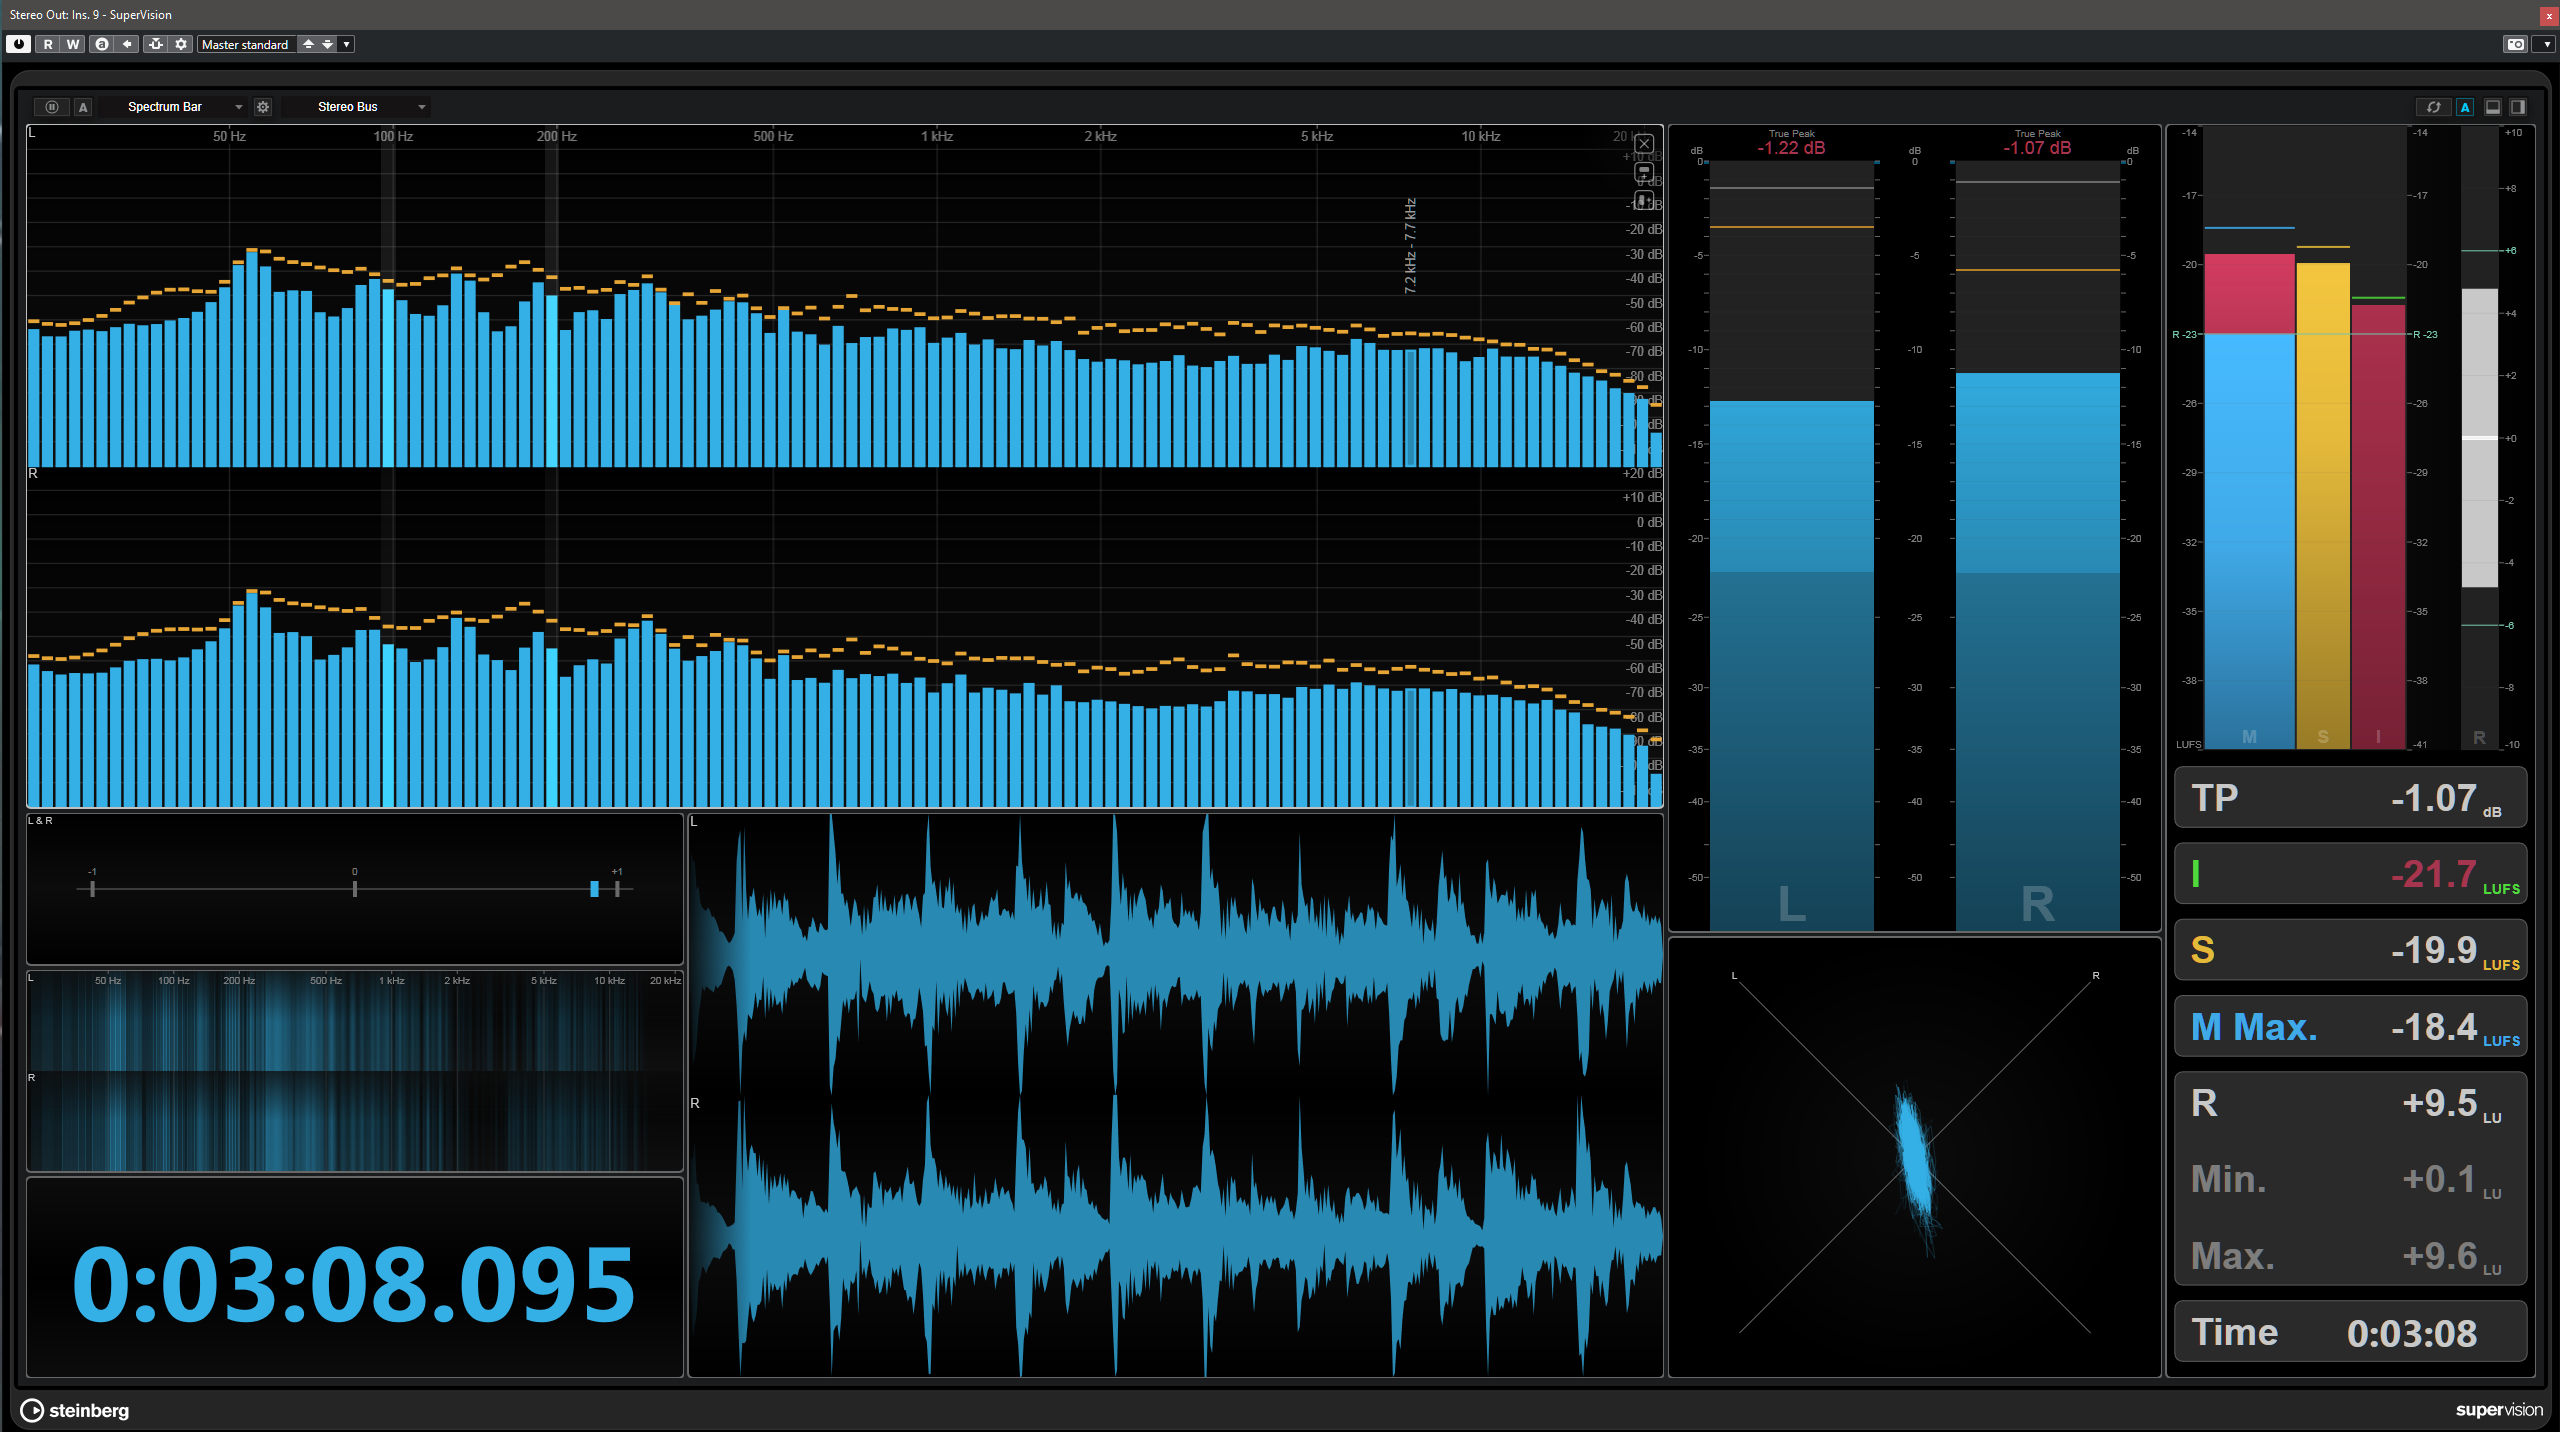
Loudness analysis
The final stage is analysis. Here I check loudness and make sure the master is landing where I want it. Most of the time I aim for somewhere between -9 and -13.5 LUFS depending on the release format and purpose. For streaming, I usually prefer something louder, around -9 to -11 LUFS. For vinyl or CD-focused material, I usually leave more room and stay around -12 to -14 LUFS. If I get here and the track is louder than I want, I go back and reduce gain at the clipper or maximizer stage. When adjusting a clipper, I reduce the added gain and the ceiling amount together so the peak relationship stays correct. Example: